How Do You Caulk Around A Bathtub: A Comprehensive Guide
Learning how to caulk around a bathtub is an essential skill for maintaining your bathroom's appearance and functionality. Proper caulking not only enhances the aesthetic appeal of your bathtub but also provides a waterproof seal that prevents water damage and mold growth. Whether you're a DIY enthusiast or a homeowner looking to improve your space, this guide will walk you through the process step by step.
Many homeowners overlook the importance of caulking around a bathtub until they encounter problems such as leaks, mold, or mildew. However, maintaining the seal between the bathtub and surrounding surfaces is crucial for long-term durability and cleanliness. Understanding how to caulk properly can save you time, money, and headaches down the road.
In this article, we will explore everything you need to know about caulking around a bathtub. From choosing the right caulk to preparing the surface and applying the sealant, each step will be explained in detail. By the end of this guide, you'll feel confident enough to tackle this project yourself and ensure your bathroom remains in top condition.
- Gkn Bowling Green Ohio
- Black Hills Energy Bill Pay Online
- I Came From A Middle Class Family
- Anadyr Adventures Valdez Ak
- Bahama House Daytona Shores
Table of Contents:
- Introduction
- Tools and Materials Needed
- Choosing the Right Caulk
- Preparing the Surface
- Removing Old Caulk
- Applying Caulk
- Smoothing the Caulk
- Cleaning Up
- The Curing Process
- Maintenance Tips
- Common Mistakes to Avoid
- Conclusion
Tools and Materials Needed
Before you begin caulking around your bathtub, it's important to gather all the necessary tools and materials. Having everything ready will make the process smoother and more efficient. Below is a list of essential items:
Tools
- Caulk gun
- Utility knife or caulk remover
- Sandpaper (fine grit)
- Putty knife
- Cleaning supplies (isopropyl alcohol, soap, water)
- Plastic spoon or caulk smoothing tool
- Masking tape
Materials
- Silicone or mildew-resistant caulk
- Caustic cleaner (optional)
- Masking tape
Choosing the right tools and materials will significantly impact the quality of your caulking job. Make sure to select a caulk that is specifically designed for bathroom use, as it will resist mold and mildew better than general-purpose products.
- Smallest Tank In The World
- Washington Nat Prem Debit
- Cavinder Twins Sports Illustrated
- Hca Florida Mercy Hospital Emergency Room
- Viola Agnes Neo Soul Cafe
Choosing the Right Caulk
When learning how to caulk around a bathtub, selecting the appropriate caulk is crucial. The type of caulk you choose will depend on the environment and the specific needs of your bathroom. Below are some popular options:
- Silicone caulk: Ideal for high-moisture areas, silicone caulk is durable and resistant to mold and mildew. It is also flexible, which makes it ideal for areas that experience movement.
- Acrylic latex caulk: This type of caulk is easier to apply and clean up than silicone but may not be as durable. It is a good choice for low-moisture areas or if you prefer a paintable finish.
- Mildew-resistant caulk: Specifically formulated to prevent mold and mildew growth, this type of caulk is perfect for bathroom environments.
Consider the specific conditions in your bathroom when making your decision. For example, if your bathtub is frequently exposed to water, silicone or mildew-resistant caulk would be the best choice.
Preparing the Surface
Proper preparation is key to achieving a successful caulking job. Cleaning and drying the surface around the bathtub will ensure that the caulk adheres properly and lasts longer. Follow these steps:
Clean the Area
Use a mixture of water and mild detergent to clean the area around the bathtub. Rinse thoroughly and dry with a clean towel. For stubborn stains or old caulk residue, you may need to use a caustic cleaner or isopropyl alcohol.
Remove Old Caulk
Old caulk must be completely removed before applying new caulk. Use a utility knife or caulk remover tool to scrape away the old sealant. Be careful not to damage the surrounding surfaces.
Sand the Surface
Lightly sand the area with fine-grit sandpaper to create a smooth surface for the new caulk. Wipe away any dust with a damp cloth and allow the area to dry completely.
By thoroughly preparing the surface, you ensure that the new caulk will adhere properly and provide a long-lasting seal.
Removing Old Caulk
Removing old caulk is an essential step in the caulking process. Old or damaged caulk can prevent new caulk from adhering properly, leading to leaks and water damage. Follow these steps:
Step 1: Soften the Caulk
Use a caulk remover spray or heat gun to soften the old caulk. This will make it easier to scrape away without damaging the surrounding surfaces.
Step 2: Scrape Away the Caulk
Using a utility knife or putty knife, carefully scrape away the old caulk. Work slowly and steadily to avoid scratching the bathtub or walls.
Step 3: Clean the Area
Once the old caulk is removed, clean the area thoroughly with a mixture of water and isopropyl alcohol. This will ensure that any remaining residue is eliminated, providing a clean surface for the new caulk.
Taking the time to remove old caulk properly will result in a more effective and longer-lasting seal.
Applying Caulk
Now that the surface is prepared, it's time to apply the new caulk. Follow these steps for a smooth and even application:
Step 1: Load the Caulk Gun
Insert the caulk tube into the caulk gun and cut the tip at a 45-degree angle. Ensure the opening matches the desired bead size for your application.
Step 2: Apply the Caulk
Hold the caulk gun at a 45-degree angle and steadily apply a bead of caulk along the seam between the bathtub and the wall. Move the gun slowly and evenly to ensure consistent coverage.
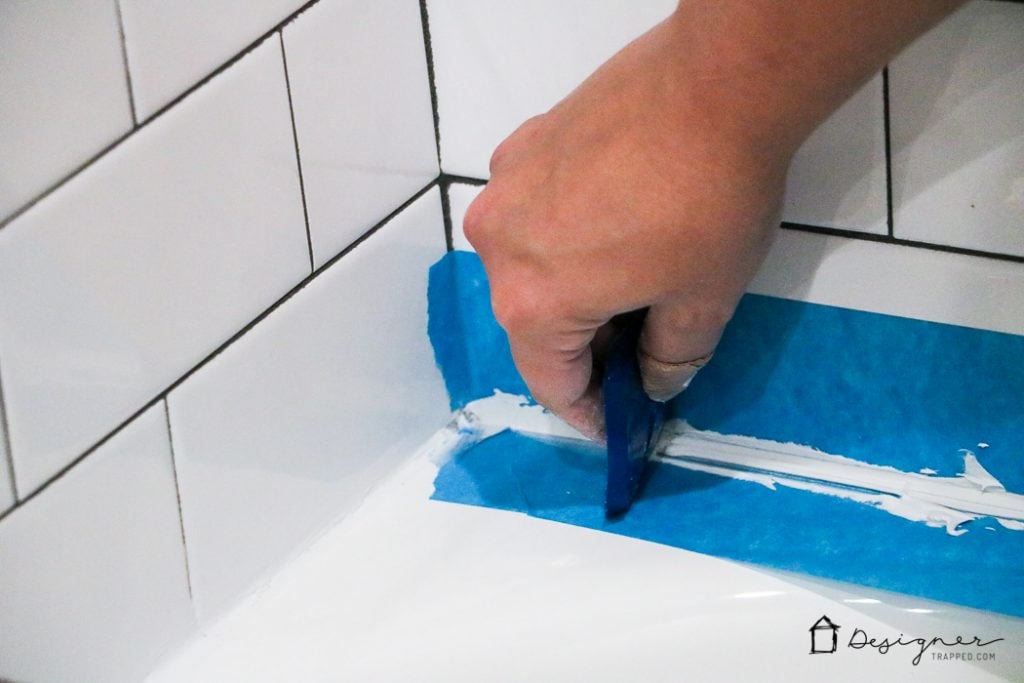
Step 3: Use Masking Tape
Apply masking tape along the edges of the seam to create clean, straight lines. This will help you achieve a professional-looking finish.
By following these steps, you can ensure that the caulk is applied evenly and effectively, providing a strong seal around your bathtub.
Smoothing the Caulk
After applying the caulk, it's important to smooth it out for a clean and professional appearance. Here's how:
Step 1: Wet Your Finger or Use a Tool
Dip your finger in water or use a plastic spoon or caulk smoothing tool to smooth the bead of caulk. Gently run your finger or tool along the seam, applying even pressure to create a smooth finish.
Step 2: Remove Masking Tape
Once the caulk is smoothed, carefully remove the masking tape while the caulk is still wet. This will ensure clean edges and prevent the caulk from peeling.
Step 3: Clean Up Excess Caulk
Use a damp cloth to wipe away any excess caulk or smudges. Be gentle to avoid disturbing the freshly applied sealant.
Smoothing the caulk is a crucial step that enhances both the appearance and functionality of your bathtub seal.
Cleaning Up
Cleaning up after caulking is just as important as the application process. Proper cleanup ensures that your tools and workspace are ready for future projects. Follow these tips:
- Wipe down your caulk gun with a damp cloth to remove any excess caulk.
- Dispose of used caulk tubes and cleaning materials properly.
- Store remaining caulk in a cool, dry place for future use.
By maintaining a clean and organized workspace, you can make future caulking projects more efficient and enjoyable.
The Curing Process
After applying the caulk, it's important to allow it to cure properly before exposing it to water. The curing process ensures that the caulk adheres securely and creates a waterproof seal. Below are some guidelines:
- Cure time: Most caulks require 24 to 48 hours to fully cure. Check the manufacturer's instructions for specific curing times.
- Avoid water exposure: Do not use the bathtub or expose the caulk to water during the curing period.
- Humidity and temperature: Ensure the bathroom is well-ventilated and maintained at a moderate temperature to facilitate proper curing.
Allowing the caulk to cure properly will maximize its effectiveness and longevity.
Maintenance Tips
To ensure your bathtub caulk remains in good condition, follow these maintenance tips:
- Regularly clean the caulk with mild soap and water to prevent buildup.
- Inspect the caulk periodically for signs of cracking or mold growth.
- Reapply caulk as needed to maintain a strong seal.
Proactive maintenance will help extend the life of your caulk and keep your bathtub looking its best.
Common Mistakes to Avoid
Even experienced DIYers can make mistakes when caulking around a bathtub. Below are some common errors to avoid:
- Not removing old caulk: Failing to remove old caulk can lead to poor adhesion and leaks.
- Applying too much caulk: Excessive caulk can create an uneven appearance and make smoothing more difficult.
- Skipping the curing process: Using the bathtub before the caulk has fully cured can compromise the seal.
By being aware of these potential pitfalls, you can avoid them and achieve a successful caulking job.
Conclusion
Learning how to caulk around a bathtub is a valuable skill that can enhance the appearance and functionality of your bathroom. By following the steps outlined in this guide, you can ensure a strong, waterproof seal that will last for years to come. Remember to choose the right caulk, prepare the surface thoroughly, and allow sufficient time for curing.
We encourage you to share this article with others who may find it helpful. If you have any questions or additional tips, feel free to leave a comment below. For more DIY home improvement guides, explore our other articles on the site.
- Marshall Mi Holiday Inn Express
- New Castle News Police Reports
- Where Do Pancakes Originate From
- City Of Milwaukee Recycling Pickup
- Rack Room Shoes Cary Nc
Should You Caulk Around Bathtub Faucets? Hunker

5 Most Common Caulking Mistakes in 2020 Caulking, Bathtub caulking
How to Caulk a Bathtub (A Cautionary Tale)
